

Spherical aberration is an optical defect where light rays passing through the edge of a lens focus at different point.
Perfectly spherical surfaces are the easiest and most cost-effective for manufacturers to grind and polish. However, a uniform spherical curve is not the mathematically ideal shape for focusing light efficiently. Instead of converging into a single, perfectly sharp point, the light spreads out, creating a blurred image with reduced contrast and sharpness.
How the Spherical Aberration Happens?
According to the laws of optical physics (Snell’s Law), light hitting the steeper, outer curvature (periphery) of a lens is bent (refracted) more aggressively than light passing near the middle (optical axis). In a standard convex lens, this causes the peripheral rays to cross and focus closer to the lens than the central rays. The tightest, clearest spot you can actually achieve is a small blurry zone known as the “circle of least confusion”.
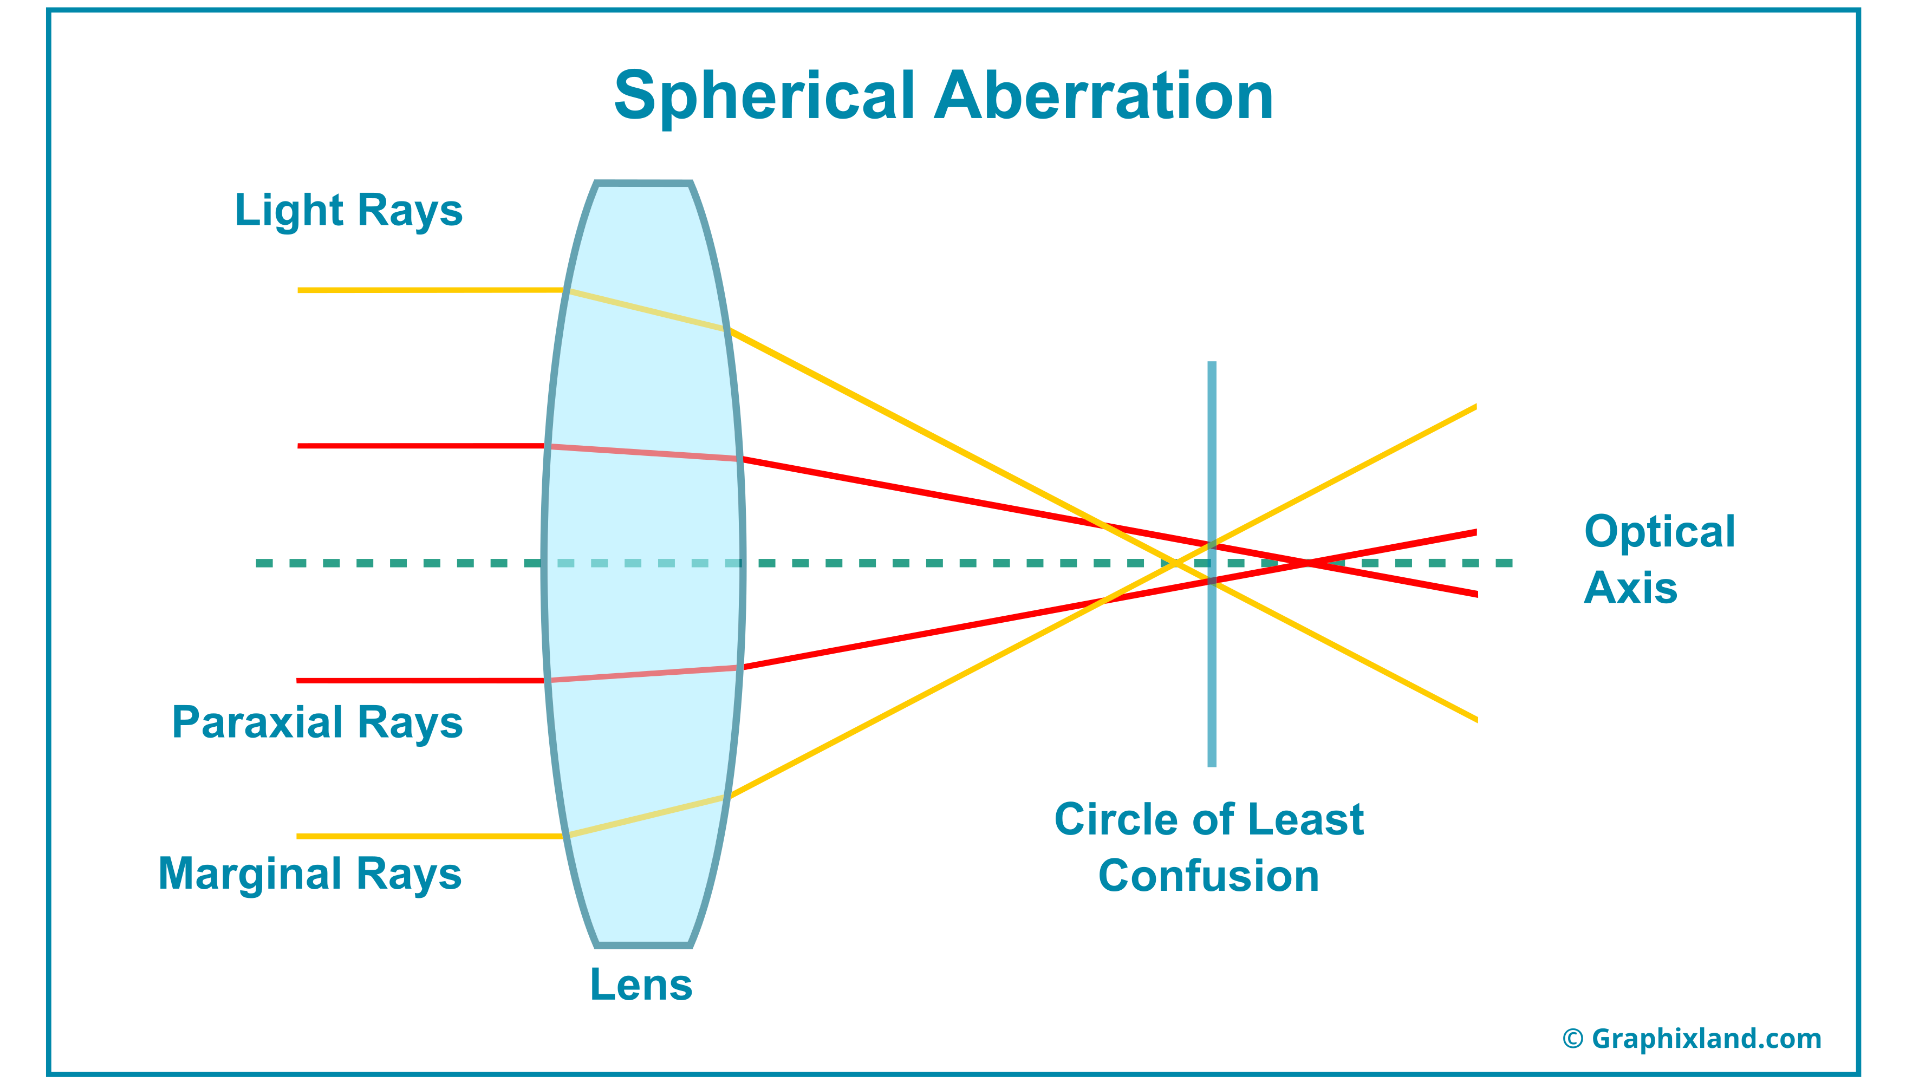
Marginal (Edge) Rays – Light rays that strike the outer edges of the lens are bent more sharply. They come to a focus closer to the lens.
Paraxial (Central) Rays – Light rays that pass through the center of the lens bend less. They come to a focus further away from the lens.
Circle of Least Confusion – Because the rays do not meet at one point, they create a blurry circle instead. The spot along the optical axis where the image is at its tightest and sharpest is called the “circle of least confusion”.
Spherical aberration increases the apparent depth of field (DOF) while reducing peak sharpness, and it creates asymmetric bokeh where either the background or the foreground blurs much more smoothly than the other. Because light rays from different zones of the lens focus at different distances rather than a single plane, the transition between sharp and out-of-focus areas stretches out over a wider zone.
Creating Corrected Lens System: Positive And Negative Spherical Aberration
Positive and negative spherical aberration describe the two opposite directions in which light rays can miss the ideal focal point, depending on whether outer rays focus closer to or farther from the lens than central rays. In optics, these terms also correspond to undercorrected and overcorrected spherical aberration.
Positive (converging) lenses naturally produce positive spherical aberration, while negative (diverging) lenses produce negative spherical aberration. By cementing or grouping positive and negative elements together (such as in an achromatic doublet), engineers cancel out the blur without needing expensive, custom-ground aspherical glass. Modern camera lenses, microscopes, and telescopes rely on balancing dozens of positive and negative spherical surfaces so that light rays across the entire lens converge on a single, razor-sharp focal plane.
Positive Spherical Aberration (Undercorrected) – Light rays passing through the outer edges of a lens bend too strongly, crossing the optical axis in front of (closer to the lens than) the rays passing through the center. This is the natural behavior of a simple converging (convex) lens with spherical surfaces. In the human eye, the front surface of the cornea naturally produces positive spherical aberration. Because background out-of-focus points have bright centers and soft edges, they blend together smoothly. Portrait photographers love positive spherical aberration for creamy, painterly backgrounds.
Negative Spherical Aberration (Overcorrected) – Light rays passing through the outer edges of a lens bend less strongly than central rays, crossing the optical axis behind (farther from the lens than) the central rays. Simple diverging (concave) lenses produce negative spherical aberration. Optical engineers use negative elements inside multi-element lenses to cancel out the positive aberration of converging elements. In the human eye, the internal crystalline lens naturally has negative spherical aberration to balance the cornea. When a lens is slightly overcorrected, background highlights develop bright, hard outer edges, while foreground blur becomes ultra-smooth.
How to Fix or Reduce the Spherical Aberration
The significance of spherical aberration lies in its direct impact on image quality, optical performance, and product design across fields like photography, astronomy, microscopy, and vision correction. It defines the physical limits of how sharp, bright, and accurate an optical system can be. Optical designers and photographers use three primary methods to correct this distortion.
Aspherical Lenses – Specially designed lens elements feature a complex, non-spherical curvature that flattens out slightly toward the edges. This forces all incoming light rays to meet at the exact same focal point.
Closing Down the Aperture – Spherical aberration is most severe when a diaphram of the lens is wide open (e.g., at f/1.4 or f/2). Closing the aperture to a higher f-number (like f/4 or f/5.6) blocks the outer edges of the lens, forcing light to only pass through the sharper center.
Multi-Element Layouts – High-quality optical systems combine multiple lenses in a row. Designers pair elements with “positive” spherical aberration alongside elements with “negative” spherical aberration so they naturally cancel each other out.
Use Spherical Aberration for Creative Photography or Filmmaking
While usually treated as a flaw, controlled spherical aberration creates a dreamy, glowing “soft focus” look around bright highlights. Vintage lenses and specialized cinema optics intentionally leave a small amount of spherical aberration uncorrected to flatter skin tones and create smooth background blur (bokeh).
You can intentionally use spherical aberration to create dreamy, glowing portraits, soft-focus vintage looks, and creamy background blur (bokeh). Because it spreads bright highlights into soft halos while keeping a faint core of sharp detail underneath, photographers and filmmakers often prize it as a creative tool rather than a flaw.
Shoot Wide Open with Vintage Lenses – Pick fast, older primes like vintage 50mm or 85mm lenses from the 1960s and 1970s lacked modern aspherical glass. Set your lens to f/1.2, f/1.4, or f/1.8. Keeping the aperture wide open lets outer light rays enter the lens, producing a glowing “Orton-style” haze and swirling or creamy bokeh.
Defocus image control (DC) lenses feature a dedicated ring that intentionally shifts spherical aberration. Turning the ring toward the front or rear smooths out either the foreground or background blur. Some modern specialty lenses are engineered specifically to leave spherical aberration uncorrected for artistic glow.
Hack a Cheap Lens (Lens Reversal or Element Flipping) – On inexpensive vintage primes, unscrewing the retaining ring and flipping the front glass element backward dramatically increases spherical aberration. This creates sharp center focus surrounded by intense radial blur and glowing highlights. Mounting a single-element meniscus lens or magnifying glass to a macro bellows or body cap gives you pure, uncorrected spherical aberration for experimental fine-art shots.
Set Up the Right Lighting and Composition – Spherical aberration reacts strongly to bright light sources. Place the sun, fairy lights, or window light behind your subject to create luminous halos around hair and edges. Dark shadows paired with bright specular highlights (like water reflections or streetlights at night) maximize the dreamy bloom effect. Because edges distort and soften heavily, placing your subject’s eyes near the center of the frame ensures they stay recognizable while the edges melt away.



Be First to Comment